iPhone Development – Reverse Geocoding

A rather nifty new feature of the iPhone SDK is the ability to reverse geocode a location. Some of you may be wondering what normal geocoding is! Well, geocoding is turning an address into a latitude and longitude. So reverse geocoding is, without surprise, turning a latitude and longitude into an address.

So, in combination with the normal iPhone lookup services, you can find out the lat,long of someone and then convert that into a friendly place name such as the town they are in. It’s very easy to do, firstly you need to implement the MKReverseGeocoderDelegate protocol in your chosen class which has two callbacks, one for when a reverse geocode is successful and one for when there is an error:

- (void)reverseGeocoder:(MKReverseGeocoder *)geocoder  didFindPlacemark:(MKPlacemark *)placemark;
- (void)reverseGeocoder:(MKReverseGeocoder *)geocoder didFailWithError:(NSError *)error;

So we create and initialise a reverse Geocoder with the following code. Note the delegate is set to self so the methods defined above should be places in the same class. locationToLookup defines where the location name we want to look up is (as a latitude, longitude coordinate).

        // use whatever lat / long values or CLLocationCoordinate2D you like here.
        CLLocationCoordinate2D locationToLookup = {52.0,0};
        MKReverseGeocoder *reverseGeocoder = [[MKReverseGeocoder alloc] initWithCoordinate:locationToLookup];
        reverseGeocoder.delegate = self;
        [reverseGeocoder start];

The first time I tried this I got the very cryptic error message below:

Terminating app due to uncaught exception 'NSInvalidArgumentException', reason: '*** -[LBSGAddressComponent _mapkit_cache_heapTime]: unrecognized selector sent to instance 0x166c00'

After a lot of head scratching I realised this is because you must only ever have one reverse geocoder running at once. So I made the reverse geocoder a class variable (to keep track of it) and added:

        if (reverseGeocoder != nil)
        {
            // release the existing reverse geocoder to stop it running
            [reverseGeocoder release];
        }
        
        // use whatever lat / long values or CLLocationCoordinate2D you like here.
        CLLocationCoordinate2D locationToLookup = {52.0,0};
        MKReverseGeocoder *reverseGeocoder = [[MKReverseGeocoder alloc] initWithCoordinate:locationToLookup];
        reverseGeocoder.delegate = self;
        [reverseGeocoder start];

This will stop any existing lookups. And so if successful your callback method will be called with an instance of MKPlacemark that represents where your lookup is. Easy.
Comment spammers scum, WordPress and re-CAPTCHA

The spam comments on this site were progressively getting worse and worse. It’s a ridiculous situation since all comments are only show after approval so not a single one was ever being shown on the site. But it still takes time to monitor and becomes more annoying as time goes on. This morning I had already had 10 and so decided enough is enough.

I installed the very excellent re-CAPTCHA. This captcha software is a bit different for several reasons. Firstly it has a WordPress plugin which took 5s to install. Secondly it helps organisations digitise books, a very honourable motive. To install you just need to:

  1. Download the archive for the plugin at http://recaptcha.net/plugins/wordpress/
  2. Unzip the archive and copy the whole wp-recaptcha directory to your wp-content/plugins/ directory under WordPress.
  3. Register at http://recaptcha.net/ , and enter your site domain to recieve a public / private key.
  4. Enable re-CAPTCHA under the Plugins section of your WordPress admin and enter the two keys under the plugin configuration.
  5. Spend less time dealing with spam.

So how does re-CAPTCHA work then? Captchas rely on testing if you are human by quizzing you on something that should be easy for a human and relatively hard for a computer to solve. OCR, i.e. recognising the image of a word as text can be extremely hard for computers if the page is distorted, grainy or badly printed. So re-CAPTCHA asks you to OCR two words. Why two? Well one is already known since it has been confirmed by other users (how else would re-CAPTCHA know your answer was correct), the other is not known and so you are providing a useful service helping a document be recognised (and providing new captcha answers for other users). Simple but ingenius.

Django Admin – An introduction and then applying a textarea instead of a text input

Well I thought now was as good a time as any to make my first Django post. One of the best things about Django is its automatic admin interface, built very effectively from just your model objects in the ORM. What a good idea. Generally, even if a webapp isn’t there just to do CRUD, its backoffice tool almost certainly is. And even the most beautiful webapps generally have awful backoffice tools. Why? Because who the hell wants to spend their time writing a boring CRUD interface 3 people are going to see! And when does business even consider time for that sort of thing, non-customer-facing mean non-thought-about.

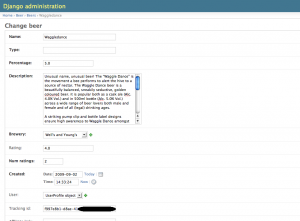
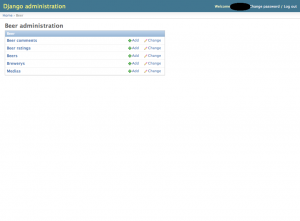
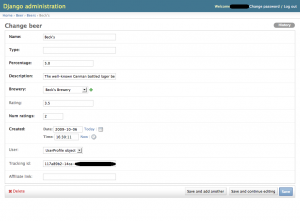
Here’s an example of the backoffice tool for What Ales You:

Choose beers Edit a beer


Pretty isn’t she (I presume admin interfaces have the same gender as ships?). To activate the admin interface ensure under settings.py that django.contrib.admin is included under INSTALLED_APPS and that in urls.py you have the relevant lines (they are marked with comments) included and uncommented. Then add a file called admin.py to each project where you wish to administer model objects. For example, mine for my beer project is currently:

from alephile.beer.models import Brewery, Beer, BeerRating, Media, BeerComment, UserProfile
from django.contrib import admin

admin.site.register(Brewery)
admin.site.register(Beer)
admin.site.register(BeerRating)
admin.site.register(BeerComment)
admin.site.register(Media)
admin.site.register(UserProfile)

This tells Django which model objects I want to be able to edit. You’ll notice that my beer description is a normal text input which is a bit annoying, what I’d prefer is a textarea. To achieve this I need to add a ModelAdmin and a ModelForm. The ModelAdmin is a class telling Django how to administer a particular model object. Each ModelAdmin contains a ModelForm which tells it how to create the editing form. By default this just includes all editable fields, but now we are going to override the ModelAdmin and tell it to use a custom form instead. We end up with:

from alephile.beer.models import Brewery, Beer, BeerRating, Media, BeerComment, UserProfile
from django.contrib import admin
from django import forms

class BeerModelForm( forms.ModelForm ):
    description = forms.CharField( widget=forms.Textarea )
    class Meta:
        model = Beer

class BeerAdmin( admin.ModelAdmin ):
    form = BeerModelForm

admin.site.register(Brewery)
admin.site.register(Beer, BeerAdmin)
admin.site.register(BeerRating)
admin.site.register(BeerComment)
admin.site.register(Media)
admin.site.register(UserProfile)

and an interface that looks like so. Easy when you know how but something I initially struggled to find out.

A better description field

Localsalefinder – BView’s iPhone App

Eating OutLondon Bridge results


To accompany my technical ADD, as part of my job at BView we’ve now released another product in another language entirely, an iPhone application.

Called Localsalefinder and powered by the BView API, it’s a fantastic iPhone app for finding local offers and redeeming them without printing out or clipping coupons.

Once we finish off all the finishing touches to the vouchers, this is going to be one powerful app. It includes integrations from the main restaurant booking engines (Toptable / Livebookings and more) plus our own vouchers and those sourced by 3rd parties.

If you’ve got an iPhone check it out! In terms of Objective-C development, I’m going to start a series of articles about the common problems and pitfalls of iPhone development.

Dan.

What Ales You

What Ales You Logo

Just a quick post to explain my lack of updates recently, I’ve been building another site in my spare time called What Ales You.

Conceptualised, designed and developed all by me, it’s a beer rating site (actually my girlfriend did the logo and name to be fair). Anyone can add, comment on and rate beers. It was written in Django, an amazing Python based web framework that takes the “convention over configuration” concept even further. In roughly 10 evenings I’ve built a site in a language I didn’t even know, impressive stuff. While some of that might be my genius, at least partial credit has to go to the excellent features of Django.

Technology ADD – On Django and Python

I seem to be suffering from a form of ADD recently. Hopefully it’s not the kind I’ll need Ritalin for although I haven’t actually checked with a doctor yet. But this is a special kind of ADD, technology ADD.

After living a lifetime stuck in a bit of a technology trap, using what everyone else seemed to be using and what recruiters wanted to see on your CV I’ve suddenly been opened up to a world of promising technologies. In the past month I’ve not only carried on writing in Ruby on Rails but have also started using Django, a full on web framework which is powered by Python.

A lot of people, my previous self included, would tend to call these new web frameworks lightweight and not suitable for really serious applications. I still haven’t quite made my mind up if this statement holds any merit but maybe a better question would be does the application you are working on have to be “serious” anyway. By serious here I mean seriously built. Does it need to scale horizontally at the flick of a switch, will you be dealing with billion row tables and processing 6,000 requests a second? They’ll probably answer that one day they might. That’s true, although only if they manage to launch without sucking up their funds building a project in a serious fashion.

Case in point about two years ago I tried a personal project in Java. Java’s what I know best so it seemed a sensible option. Professionally I work on a robust codebase with a great Spring / Hibernate base, full on integration testing, custom authentication code and a beautiful Ant based build environment. But I also forgot that the environment took 5 smart people 2 months to set up. Admittedly I now knew the general setup but it was hard work being disciplined and trying to write so much from scratch, in my SPARE TIME. The initial setup must have taken 6 months. I had lost all enthusiasm for it by that point.

Two weeks ago I started a project in Django. I didn’t even know Python. In a week of spare time work I’ve got a fully working database model, authentication framework, frontend with templating. I’d estimate I might have spent about the same time drawing pretty pictures for the frontend as writing backend code. That is truly astounding. I was impressed with Ruby on Rails but this is another level. Webapps can be coded in less time than it would take you to draw a UML diagram or database hierarchy.

The best thing is it has brought back my enthusiasm and hopes for personal projects. When writing something in your spare time, the best thing you can do is finish something. Don’t obsess over perfect theoretical programming practices, scalability and how you’re going to track sessions across multiple servers when you haven’t even got something launched. Obviously if you’ve got £1,000,000 and know your app is going to be huge, build everything as well as you can. For the rest of us I’d suggest speed is the more important factor.

Flex – controlling parent page by Javascript using ExternalInterface

When developing a Flex application you are generally involved with the nitty gritty coding, getting your text boxes looking right; hooking up that button and making sure your webservices are behaving. Something you probably haven’t started to consider is that the SWF you end up with is going to have to live on a page somewhere. When you get closer to release time, suddenly your thoughts turn to integrating your application with an actual webpage.

A very useful trick to be aware of is that your Flex application can control its parent page to a certain extent by executing Javascript on it. So for example, at graffed.com you’ll notice that instead of showing the Flex application straight away, we show a basic loading image in HTML and then once the entire app has loaded, we switch the loading image to a button to launch the app.

Loading the app

Loading the app

Loading completed

Loading completed


This way, visitors are shown a landing page which loads very quickly that they can read through, and the application is loaded in the background. Once the application is loaded, the parent page displays a nice button for them to launch. It’s also good for SEO since the parent page is what the search engines will see, rather than a blank page with a Flex application.

To achieve this magic, we use ExternalInterface to interact with the parent page. First off, create an appropriate Javascript function within your parent page for the Flex app to call, let’s say it’s called flexLoaded(). To call this Javascript method in your Flex application, you simply put:

ExternalInterface.call("flexLoaded");

Exceptionally easy and a very powerful way to influence the page your SWF resides in. Don’t forget to import the appropriate library at the top of the Actionscript, i.e

import flash.external.*;

Announcing graffed.com, the new way to track your body shape, not just your weight

I’ve hinted a few times about a Flex application I’ve been working on. Well now is the time to reveal the app, graffed.com.

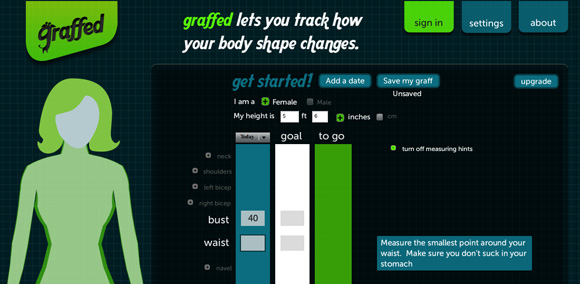
Graffed is a site that lets you track your body shape instead of just your weight. You can see in real time your silhouette overlaid with your target body, showing you where you’ve lost weight and shaped up. It was a long hard slog to write but I’ve been very impressed with the Flex technology (Flash for programmers if you will) and it’s taught me a lot. For a limited time, premium accounts are totally free so sign up and give it a go:

The new site in all its glory

The new site in all its glory

Flex – extra unbound custom parameters in a webservice

One of the greatest parts of Flex is the ease of integration to other servers. As a client side technology, Flex is clearly designed to embrace communication between itself and external servers and not make the programmer jump through hoops to get there. To that end it has the component mx:HTTPService, they can literally be defined in the XML components of your MXML document. That is seriously trivial, close to as easy as writing a tag in an HTML document. Forget worrying about establishing connections, sending data and processing the data returned. Typically, the values sent by the web service are tied to components in the document, e.g. say we have a webservice which sends the value of a textbox called myTextBox to the url http://myserver.com/myurl:

<mx:Script>
    <![CDATA[

        import mx.controls.Alert;
        import mx.rpc.events.ResultEvent;

        private function handleReturn(event:ResultEvent):void
        {
            Alert.show("returned from the webservice");
        }

        private function send():void
        {
            myWebServiceName.send();
        }

    ]]>
</mx:Script>

<mx:HTTPService
    id="myWebServiceName"
    url="http://myserver.com/myurl"
    contentType="application/xml"
    resultFormat="e4x"
    method="POST"
    result="handleReturn(event)">
    <mx:request>
        <sentdata>
            <text>{myTextBox.text}</text>
        </sentdata>
    </mx:request>
</mx:HTTPService>

<mx:TextInput id="myTextBox" />

Here the method send() will invoke the webservice with the up to date textbox data, parse the returned data as XML and call the callback method handleReturn. Great. But what if we want to attach data which is not so easily bindable, say the property of an object defined in your actionscript. Then we just need to set it on the webservice before calling .send(). For example say you had an global ActionScript object user with a public property called id which you needed to send with the request as user_id:

private function send():void
{
    myWebService.sentdata.user_id = user.id;
    myWebServiceName.send();
}

Note that sentdata is just the name of the top level XML node I include all the sent data under, it could be anything of your choosing. Because of the slight slackness of object structure in Flex and Actionscript, you can define the dynamic XML structure on the fly with myWebService.MYTOPNODE.MYNODE = DATA where MYTOPNODE, MYNODE and DATA are all what you need. Good stuff.

Flex application initialisation code using creationComplete

This is only a very small post, but something I initially struggled to find so I have deemed it worthy.

Compared to traditional UI coding, Flex hides the application flow entirely away from the programmer. You don’t need to worry about initialising the window objects, you don’t need to know about the event processing thread and you should not be concerned with how your components get drawn. All in all that is a fantastic thing. But I initially struggled to determine how to run some code once a Flex application has been loaded. For example in my latest (and soon to be posted about) project graffed, on initialisation I wanted to load the user details if they were cookied. It’s actually extremely easy, in your top level MXML mx:Application tag, simply add the attribute creationComplete=”init()”. Here init() refers to a function within the script data of the MXML file, e.g.

<mx:Application xmlns:mx="http://www.adobe.com/2006/mxml" creationComplete="init()">
    <mx:Script>
        <![CDATA[
        import mx.controls.Alert;

        private function init():void
        {
            Alert.show("Starting the program"):
        }
        ]]>
    </mx:Script>
</mx:Application>

Here, the program will run init() on launch and give you a nice informative message. Simple.

« Newer PostsOlder Posts »